Fencing your property doesn’t have to mean buying costly panels or installing expensive wood or vinyl boards. A budget living fence offers an affordable, eco-friendly, and beautiful solution that grows over time. In this expert guide, you’ll discover how to choose the right plants, repurpose materials, and follow practical steps to build your own living fence—without breaking the bank.
Why Choose a Living Fence?
The cost of traditional fencing materials continues to rise. Even a basic wooden fence can cost $25 to $50 per linear foot when professionally installed. For a standard suburban yard, this can mean spending thousands. In contrast, a living fence made from fast-growing plants and recycled supports can save homeowners hundreds—or even thousands—while delivering more benefits.
Living fences provide long-term value. They improve air quality, support wildlife, reduce noise, and cool surrounding areas naturally. In urban spaces, they help combat the heat island effect and provide privacy without harsh visual lines. These natural barriers also create microhabitats for birds and pollinators, boosting local biodiversity.
A well-maintained living fence adds curb appeal and beauty throughout the seasons. Many varieties flower in spring, offer lush greenery in summer, and develop rich hues in fall. Real estate reports show that green landscaping features—including living fences—can increase home resale value by as much as 15% in environmentally aware markets.
Choosing a budget living fence is about more than saving money. It’s about creating something enduring, natural, and meaningful—something you’ll enjoy watching grow.
Essential Materials and Tools
Building a living fence doesn’t require expensive tools or materials. In fact, many of the best supplies are inexpensive or even free. The first step is to think creatively about how to use what you already have—or can get locally with little to no cost.
Start by gathering base materials for plant support. Reclaimed wood from pallets or old fencing is often available for free through local classified ads or construction sites. You can also use cattle panels or welded wire mesh, both of which are affordable and widely sold at farm supply or hardware stores. Bamboo poles, which are lightweight and strong, can also be a cost-effective choice if you have access to them.
Your tool list will be basic: a shovel or spade for digging, gardening gloves, pruning shears, a trowel, and a measuring tape. A hose or watering can will help keep your plants hydrated during early stages.
Creative DIYers often repurpose everyday items into plant supports. Old bed frames, wire shelving units, even broken ladders can become rustic, functional backbones for climbing plants. You don’t need to invest in fancy trellises—especially when fast-growing vines will soon hide the structure anyway.
A surprising tip: certain vines, like honeysuckle and hops, cling naturally to textured walls or fences, reducing or eliminating the need for trellises altogether. With just a few dollars and some ingenuity, you can gather everything you need to get started.
Best Plants for a Living Fence
Plant selection is one of the most important parts of building a living fence on a budget. The right plants will grow quickly, provide year-round interest, and require little maintenance once established.
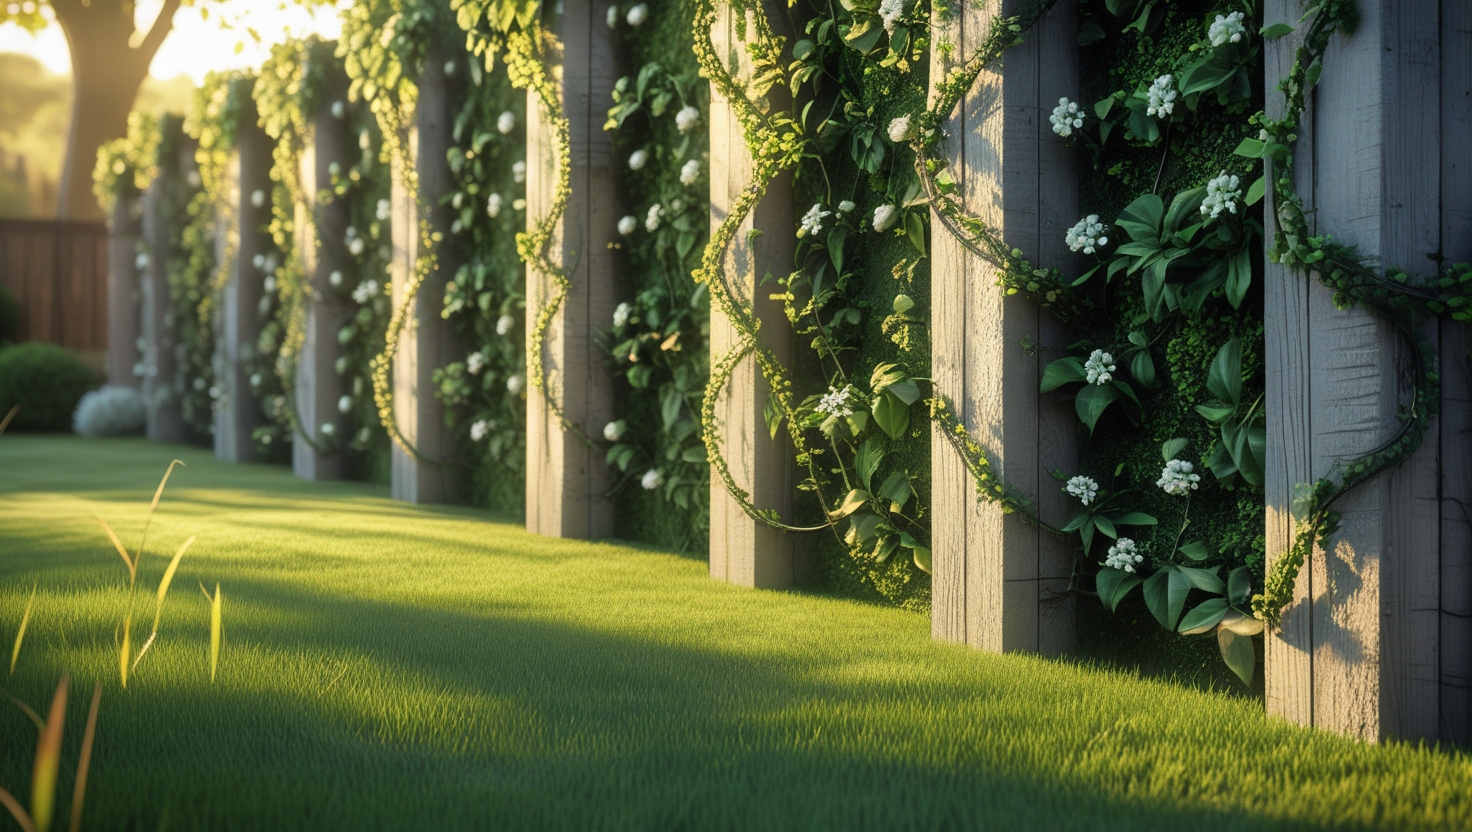
Fast-growing shrubs like arborvitae and privet are ideal for privacy. Arborvitae grows tall and dense with minimal shaping and stays green all year. Privet is adaptable and fast, but may require regular trimming. Willows are great in wetter areas, offering flexibility and fast establishment. Bamboo is another fast-grower, but it must be managed carefully to avoid overgrowth or spreading.

If you’re looking for something more decorative or suited to small spaces, consider vines and climbers. English ivy provides lush coverage quickly. Hops vines grow fast and thrive in a variety of climates. Passionflower produces beautiful blooms and edible fruit in warmer zones. Morning glories are another easy favorite, with vibrant flowers that bloom in succession.
Native plants are your best bet for low-maintenance, high-success fences. They’re already adapted to your local soil and climate, which means they’ll thrive with less watering and feeding. For example, on the West Coast, manzanita and California lilac are excellent drought-resistant choices. In the Northeast, viburnum, dogwood, and elderberry are strong performers. In the Southeast, yaupon holly and coral honeysuckle provide beauty and structure.
Native plants also support local wildlife—something many commercial landscaping plans overlook. By choosing plants that naturally occur in your region, you’re helping pollinators, birds, and other beneficial species thrive.
Step-by-Step Installation Guide
Once your plants and materials are ready, it’s time to install your living fence. Careful setup ensures a healthy, thriving structure for years to come.
Start by measuring the area. Use string or garden hose to map your layout. Clear the path of any grass, weeds, or debris. Good preparation at this stage prevents competition and encourages strong root systems.
If possible, test your soil. Affordable kits are available online or at garden centers. Knowing your soil’s pH and nutrient levels helps you choose the right plants or add compost, mulch, or soil conditioners as needed.
Next, install your support structure. For shrubs and trees, this may be as simple as marking out spacing and digging planting holes. For vines and climbing plants, erect posts or poles spaced 6 to 8 feet apart, then run wire or rope horizontally to create a scaffold. Welded wire mesh panels can be attached between posts for extra strength.
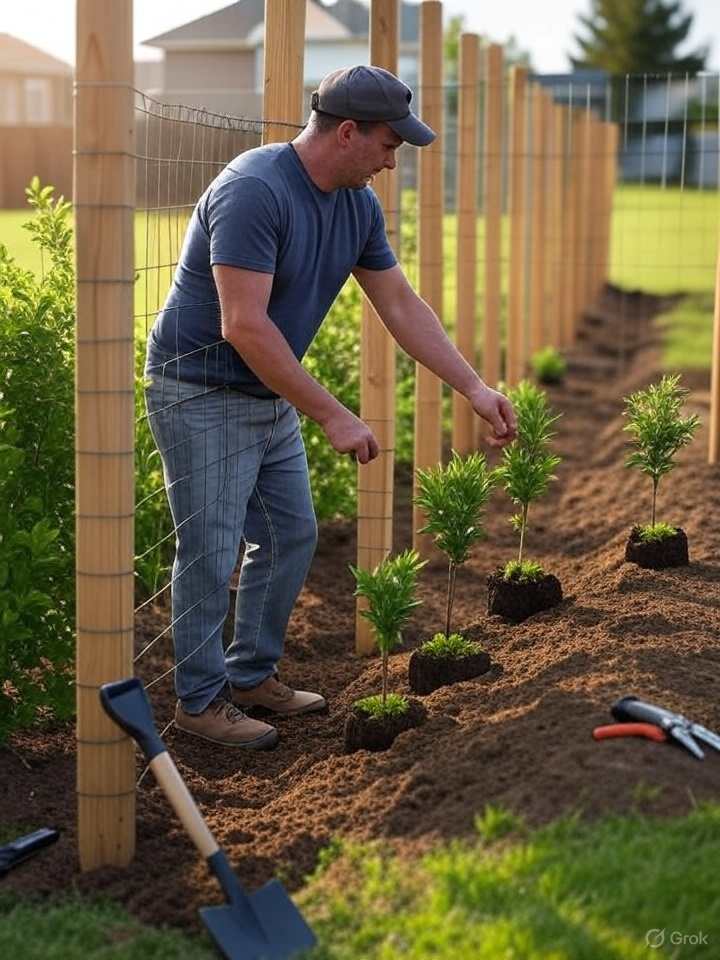
When planting, follow spacing guidelines specific to each species. As a general rule, shrubs should be spaced 2 to 3 feet apart, while vines can go closer. Dig holes twice the width of the plant’s root ball and backfill with compost-enriched soil. Water thoroughly.
To boost early growth, consider interplanting nitrogen-fixing species like clover or beans between your primary plants. These species improve soil fertility naturally and reduce the need for fertilizers—a little-known but powerful tip for living fence success.
Finally, apply mulch around the base of your plants to retain moisture and suppress weeds. Your living fence is now in place, ready to take root and grow.
Maintenance and Troubleshooting
The first year is critical for establishing your living fence. With a little attention and patience, your fence will flourish with minimal input.
Water your plants regularly, especially during dry spells. Most new plantings need watering at least once a week until established. After that, most native or drought-tolerant species can handle natural rainfall with occasional support.
Pruning is essential for shaping and maintaining density. Trim plants lightly throughout the growing season to encourage lateral growth and prevent leggy stems. Use sharp pruning shears and make clean cuts above nodes or leaf joints.
Feeding requirements will vary by plant. A balanced organic fertilizer or compost tea can be applied in spring to boost growth. Avoid synthetic fertilizers unless necessary—they can disrupt soil health over time.
For pest management, start with prevention. Healthy plants in good soil are more resilient. If pests do show up, try natural remedies first. Neem oil, insecticidal soap, and garlic spray are effective against many common bugs. You can also attract beneficial insects like ladybugs and lacewings by planting companion flowers such as marigolds and dill nearby.
Weeds should be pulled early and often. Mulching and dense planting will naturally reduce weed pressure, but vigilance in the first season pays off long-term.
Your fence may need minor adjustments as it grows. Posts may settle, or plants may lean. A little seasonal maintenance will keep everything looking and working its best.
Real-World Success Stories
Budget living fence isn’t just a Pinterest trend—they’re practical solutions embraced by everyday homeowners.
In Portland, Oregon, a family transformed their backyard using donated trellis panels and a dozen fast-growing clematis vines. Within two years, their entire back lot line was covered in dense foliage and vibrant blooms. The total cost was under $300.
Outside of Asheville, North Carolina, a couple used willow saplings planted in rows and interwoven into a natural fence. By year three, they had a sturdy, sculptural wall that provided privacy and served as a windbreak. Local wildlife, including wrens and pollinators, made it home.
A homeowner in Sacramento repurposed shipping pallets into vertical planters along the side of her property. She trained morning glories and scarlet runner beans to grow up the frames. The result: a flower-covered privacy screen with practically zero budget.
These examples show that no matter your region or space, a budget living fence is possible—and powerful.
Market Trends and Future Outlook
Interest in living fences continues to grow, especially in suburban and semi-urban communities where privacy and aesthetics go hand in hand. Searches for “affordable garden fence” and “plant-based fence” have increased steadily year-over-year.
Nurseries are beginning to bundle living fence kits that include fast-growing plants, biodegradable mesh, and natural fertilizers. Cities and homeowner associations are recognizing their ecological value, and some communities are offering landscaping incentives for green improvements.
Living fences align perfectly with rising interest in sustainable landscaping, climate-resilient gardening, and DIY outdoor projects. As awareness increases, we can expect more innovation in plant varieties, support structures, and community education.
Frequently Asked Questions
Most fences reach moderate coverage within one to two years, with full maturity in three to five depending on plant type and climate.
Use reclaimed wood, free or low-cost native plants, and recycled support materials. Many people complete their entire fence for under $300.
Yes. Dense, thorny, or tall species provide both seclusion and a natural barrier against intrusion.
With regular maintenance and occasional replanting, living fences can last decades and adapt to your changing landscape.
Some municipalities offer green landscaping grants or water-wise gardening incentives that include living fences—check with your local government.
Key Takeaways to Grow Your Own Living Fence
- Living fences offer beauty, function, and savings.
- Choose fast-growing, climate-appropriate plants for best results.
- Reuse materials creatively to stay on budget.
- Support early growth with regular watering and pruning.
- Let your fence evolve—it’s a living part of your landscape.
A budget living fence isn’t just a smart project—it’s a way to reconnect with nature, beautify your space, and build something that truly lasts. All you need is a vision, a few tools, and the patience to grow.